" width="0px"/><g d="M 45.373 13.048 C 45.373 17.129 42.669 20.432 38.162 20.432 C 33.655 20.432 30.951 17.129 30.951 13.048 C 30.951 8.966 33.655 5.664 38.162 5.664 C 42.669 5.664 45.373 8.966 45.373 13.048 Z M 42.586 13.048 C 42.586 10.32 40.926 8.125 38.161 8.125 C 35.395 8.125 33.735 10.32 33.735 13.048 C 33.735 15.775 35.395 17.971 38.161 17.971 C 40.926 17.971 42.586 15.775 42.586 13.048 Z M 53.568 9.541 L 53.568 11.66 C 53.568 11.811 53.442 11.932 53.292 11.924 C 50.463 11.802 49.635 12.906 49.635 15.57 L 49.635 20.003 C 49.635 20.149 49.517 20.268 49.37 20.268 L 47.278 20.268 C 47.207 20.268 47.14 20.24 47.09 20.191 C 47.04 20.141 47.012 20.073 47.012 20.003 L 47.012 9.702 C 47.012 9.556 47.131 9.437 47.278 9.437 L 49.37 9.437 C 49.516 9.437 49.635 9.555 49.635 9.702 L 49.635 10.032 C 49.635 10.504 49.512 10.914 49.327 11.284 C 49.245 11.469 49.184 11.714 49.43 11.756 C 49.553 11.776 49.655 11.612 49.676 11.551 C 50.308 10.106 50.884 9.33 53.296 9.277 C 53.368 9.276 53.437 9.303 53.488 9.353 C 53.539 9.403 53.568 9.471 53.569 9.542 Z M 56.353 5.499 C 57.077 5.499 57.664 6.086 57.664 6.811 C 57.664 7.536 57.077 8.123 56.353 8.123 C 55.629 8.123 55.043 7.536 55.043 6.811 C 55.043 6.086 55.629 5.499 56.353 5.499 Z M 57.665 9.702 L 57.665 20.003 C 57.665 20.149 57.547 20.268 57.4 20.268 L 55.308 20.268 C 55.237 20.268 55.17 20.24 55.12 20.191 C 55.071 20.141 55.043 20.073 55.043 20.003 L 55.043 9.702 C 55.043 9.556 55.161 9.437 55.308 9.437 L 57.4 9.437 C 57.546 9.437 57.665 9.555 57.665 9.702 Z M 63.852 9.273 C 65.525 9.273 66.57 10.109 67.266 11.231 C 67.271 11.239 67.275 11.246 67.278 11.255 C 67.311 11.32 67.429 11.544 67.6 11.469 C 67.805 11.387 67.662 11.12 67.558 10.915 C 67.395 10.607 67.334 10.32 67.334 9.93 L 67.334 9.704 C 67.334 9.558 67.452 9.438 67.599 9.438 L 69.691 9.438 C 69.836 9.438 69.956 9.556 69.956 9.704 L 69.956 19.121 C 69.956 22.587 67.928 24.373 64.61 24.373 C 61.291 24.373 59.815 22.727 59.506 20.823 C 59.479 20.662 59.606 20.516 59.768 20.516 L 61.825 20.516 C 61.951 20.516 62.058 20.606 62.084 20.729 C 62.274 21.605 62.955 22.239 64.568 22.239 C 66.411 22.239 67.334 21.213 67.334 19.223 C 67.334 18.853 67.395 18.566 67.558 18.259 C 67.66 18.054 67.805 17.849 67.6 17.746 C 67.415 17.664 67.314 17.848 67.272 17.931 C 66.576 19.121 65.49 19.941 63.851 19.941 C 61.044 19.941 59.139 17.521 59.139 14.608 C 59.139 11.695 61.044 9.274 63.851 9.274 Z M 67.334 14.607 C 67.334 13.006 66.186 11.652 64.465 11.652 C 62.622 11.652 61.761 13.006 61.761 14.607 C 61.761 16.207 62.622 17.561 64.465 17.561 C 66.186 17.561 67.334 16.207 67.334 14.607 Z M 73.399 5.499 C 74.122 5.499 74.709 6.086 74.709 6.811 C 74.709 7.536 74.122 8.123 73.399 8.123 C 72.675 8.123 72.088 7.536 72.088 6.811 C 72.088 6.086 72.675 5.499 73.399 5.499 Z M 74.709 9.702 L 74.709 20.003 C 74.709 20.149 74.591 20.268 74.444 20.268 L 72.352 20.268 C 72.282 20.268 72.214 20.24 72.164 20.191 C 72.115 20.141 72.087 20.073 72.087 20.003 L 72.087 9.702 C 72.087 9.556 72.205 9.437 72.352 9.437 L 74.444 9.437 C 74.59 9.437 74.709 9.555 74.709 9.702 Z M 87 13.868 L 87 20.003 C 87 20.149 86.882 20.268 86.735 20.268 L 84.643 20.268 C 84.496 20.268 84.378 20.149 84.378 20.003 L 84.378 14.77 C 84.378 12.329 83.743 11.652 82.37 11.652 C 80.854 11.652 79.461 13.355 79.461 15.857 L 79.461 20.002 C 79.461 20.148 79.343 20.267 79.196 20.267 L 77.104 20.267 C 77.034 20.267 76.966 20.239 76.916 20.189 C 76.867 20.14 76.839 20.072 76.839 20.002 L 76.839 9.702 C 76.839 9.556 76.957 9.437 77.104 9.437 L 79.196 9.437 C 79.342 9.437 79.461 9.555 79.461 9.702 L 79.461 10.114 C 79.461 10.77 79.338 11.16 79.133 11.591 C 79.052 11.776 78.928 12.063 79.195 12.124 C 79.358 12.166 79.42 12.043 79.503 11.878 C 79.994 10.791 81.224 9.272 83.107 9.272 C 85.443 9.272 87 10.789 87 13.867 Z M 12.859 25.72 C 19.961 25.72 25.719 19.962 25.719 12.86 C 25.719 5.758 19.961 0 12.859 0 C 5.757 0 0 5.758 0 12.86 C 0 19.962 5.757 25.72 12.859 25.72 Z M 12.84 1.064 C 18.125 1.064 22.604 4.568 24.092 9.376 C 24.244 9.866 23.709 10.286 23.268 10.025 C 23.112 9.933 22.959 9.836 22.808 9.736 C 21.87 9.11 21.139 8.272 20.285 7.547 C 19.547 6.922 18.68 6.368 17.678 6.386 C 16.68 6.404 15.874 6.989 15.022 7.433 C 14.681 7.611 14.275 7.808 13.881 7.709 C 13.351 7.573 13.007 6.986 12.679 6.59 C 12.034 5.81 11.255 5.012 10.25 4.737 C 8.006 4.126 6.707 6.364 5.532 7.835 C 4.526 9.094 3.399 10.25 2.165 11.288 C 1.766 11.625 1.158 11.273 1.251 10.758 C 2.242 5.254 7.06 1.064 12.84 1.064 Z M 21.438 12.726 C 20.683 12.32 19.892 11.948 19.057 11.746 C 17.972 11.484 16.882 11.621 15.783 11.551 C 14.666 11.48 13.61 11.06 12.515 10.854 C 11.526 10.667 10.511 10.673 9.525 10.873 C 7.46 11.285 5.625 12.437 3.875 13.555 C 3.205 13.982 2.52 14.419 1.812 14.811 C 1.563 14.949 1.252 14.797 1.212 14.514 C 1.191 14.364 1.173 14.213 1.157 14.063 C 1.131 13.802 1.245 13.547 1.457 13.393 C 2.893 12.357 4.225 11.179 5.416 9.867 C 6.147 9.062 6.783 8.193 7.449 7.336 C 8.028 6.591 8.829 5.661 9.884 5.888 C 11.822 6.305 12.251 9.277 14.504 8.912 C 15.431 8.761 16.148 8.114 16.996 7.765 C 18 7.353 18.857 7.868 19.608 8.529 C 20.482 9.297 21.262 10.136 22.237 10.787 C 22.852 11.198 23.512 11.541 24.197 11.819 C 24.457 11.924 24.63 12.175 24.642 12.454 C 24.648 12.592 24.652 12.731 24.652 12.871 C 24.652 13.186 24.637 13.498 24.613 13.808 C 24.589 14.087 24.296 14.263 24.043 14.146 C 23.147 13.735 22.297 13.186 21.442 12.727 L 21.438 12.726 Z M 24.211 15.968 C 24.158 16.161 24.1 16.353 24.037 16.544 C 23.934 16.852 23.572 16.986 23.291 16.824 C 21.971 16.063 20.736 15.144 19.309 14.575 C 18.29 14.168 17.235 14.144 16.222 14.572 C 15.253 14.983 14.416 15.718 13.375 15.955 C 12.206 16.219 10.983 15.936 9.805 16.202 C 8.705 16.45 7.755 17.09 6.738 17.543 C 5.521 18.086 4.23 18.374 2.915 18.534 C 2.705 18.56 2.501 18.453 2.402 18.266 C 2.133 17.747 1.902 17.209 1.713 16.656 C 1.631 16.413 1.736 16.147 1.962 16.026 C 4.192 14.832 6.241 13.163 8.649 12.332 C 9.629 11.992 10.657 11.807 11.695 11.915 C 12.802 12.031 13.851 12.458 14.949 12.634 C 16.09 12.818 17.253 12.614 18.389 12.809 C 19.252 12.957 20.054 13.326 20.82 13.737 C 21.848 14.289 22.848 14.915 23.914 15.355 C 24.155 15.455 24.283 15.719 24.213 15.969 L 24.211 15.968 Z M 22.266 19.948 C 21.978 20.333 21.505 20.532 21.027 20.491 C 19.567 20.366 18.107 20.258 16.643 20.212 C 12.708 20.091 8.792 20.477 4.873 20.799 C 4.4 20.838 3.942 20.634 3.646 20.262 C 3.638 20.254 3.633 20.245 3.626 20.238 C 3.453 20.022 3.582 19.699 3.853 19.655 C 4.476 19.552 5.091 19.418 5.698 19.238 C 6.811 18.908 7.806 18.372 8.847 17.87 C 9.36 17.622 9.898 17.415 10.466 17.345 C 11.118 17.266 11.78 17.323 12.434 17.305 C 13.58 17.27 14.529 16.916 15.509 16.345 C 16.508 15.766 17.406 15.281 18.583 15.648 C 19.675 15.988 20.646 16.729 21.61 17.325 C 22.057 17.602 22.511 17.87 22.975 18.117 C 23.154 18.213 23.228 18.435 23.129 18.613 C 22.871 19.078 22.581 19.525 22.262 19.95 Z M 6.206 22.604 C 5.891 22.387 6.026 21.892 6.407 21.859 C 6.97 21.811 7.532 21.765 8.096 21.72 C 10.601 21.518 13.112 21.353 15.628 21.377 C 16.994 21.389 18.359 21.466 19.722 21.571 C 20.096 21.6 20.24 22.077 19.942 22.303 C 17.971 23.791 15.521 24.675 12.867 24.675 C 10.397 24.675 8.104 23.91 6.208 22.604 Z" fill="transparent" height="25.72px" id="P15llhcUs" transform="translate(2 0)" width="87.00000304793184px"><path d="M 14.422 7.549 C 14.422 11.631 11.718 14.933 7.211 14.933 C 2.704 14.933 0 11.63 0 7.549 C 0 3.467 2.704 0.165 7.211 0.165 C 11.718 0.165 14.422 3.468 14.422 7.549 Z M 11.635 7.549 C 11.635 4.821 9.975 2.626 7.21 2.626 C 4.444 2.626 2.784 4.821 2.784 7.549 C 2.784 10.277 4.444 12.472 7.21 12.472 C 9.975 12.472 11.635 10.277 11.635 7.549 Z M 22.616 4.042 L 22.616 6.161 C 22.616 6.312 22.491 6.433 22.341 6.426 C 19.512 6.303 18.684 7.407 18.684 10.072 L 18.684 14.504 C 18.684 14.65 18.566 14.77 18.419 14.77 L 16.327 14.77 C 16.256 14.77 16.189 14.742 16.139 14.692 C 16.089 14.642 16.061 14.575 16.061 14.504 L 16.061 4.204 C 16.061 4.058 16.18 3.938 16.327 3.938 L 18.419 3.938 C 18.564 3.938 18.684 4.056 18.684 4.204 L 18.684 4.533 C 18.684 5.005 18.561 5.415 18.376 5.785 C 18.294 5.97 18.233 6.215 18.479 6.257 C 18.602 6.277 18.704 6.113 18.725 6.052 C 19.357 4.607 19.933 3.831 22.345 3.778 C 22.417 3.777 22.486 3.804 22.537 3.854 C 22.588 3.904 22.617 3.972 22.618 4.044 Z M 25.402 0 C 26.126 0 26.713 0.587 26.713 1.312 C 26.713 2.037 26.126 2.625 25.402 2.625 C 24.678 2.625 24.092 2.037 24.092 1.312 C 24.092 0.587 24.678 0 25.402 0 Z M 26.714 4.204 L 26.714 14.504 C 26.714 14.65 26.596 14.77 26.449 14.77 L 24.357 14.77 C 24.286 14.77 24.219 14.742 24.169 14.692 C 24.12 14.642 24.092 14.575 24.092 14.504 L 24.092 4.204 C 24.092 4.058 24.21 3.938 24.357 3.938 L 26.449 3.938 C 26.595 3.938 26.714 4.056 26.714 4.204 Z M 32.901 3.774 C 34.574 3.774 35.619 4.61 36.315 5.732 C 36.32 5.74 36.323 5.747 36.327 5.756 C 36.36 5.822 36.478 6.045 36.649 5.97 C 36.854 5.888 36.71 5.622 36.607 5.416 C 36.444 5.108 36.382 4.821 36.382 4.431 L 36.382 4.205 C 36.382 4.059 36.501 3.939 36.648 3.939 L 38.74 3.939 C 38.885 3.939 39.005 4.058 39.005 4.205 L 39.005 13.622 C 39.005 17.089 36.977 18.874 33.658 18.874 C 30.34 18.874 28.864 17.228 28.555 15.325 C 28.528 15.163 28.655 15.018 28.817 15.018 L 30.874 15.018 C 31 15.018 31.107 15.107 31.133 15.23 C 31.323 16.106 32.004 16.74 33.617 16.74 C 35.46 16.74 36.382 15.715 36.382 13.724 C 36.382 13.354 36.444 13.067 36.607 12.76 C 36.709 12.555 36.854 12.35 36.649 12.247 C 36.464 12.165 36.362 12.349 36.321 12.432 C 35.625 13.622 34.539 14.443 32.899 14.443 C 30.093 14.443 28.188 12.022 28.188 9.109 C 28.188 6.197 30.093 3.776 32.899 3.776 Z M 36.382 9.108 C 36.382 7.508 35.235 6.154 33.514 6.154 C 31.671 6.154 30.81 7.508 30.81 9.108 C 30.81 10.708 31.671 12.062 33.514 12.062 C 35.235 12.062 36.382 10.708 36.382 9.108 Z M 42.447 0 C 43.171 0 43.758 0.587 43.758 1.312 C 43.758 2.037 43.171 2.625 42.447 2.625 C 41.724 2.625 41.137 2.037 41.137 1.312 C 41.137 0.587 41.724 0 42.447 0 Z M 43.758 4.204 L 43.758 14.504 C 43.758 14.65 43.64 14.77 43.493 14.77 L 41.401 14.77 C 41.33 14.77 41.263 14.742 41.213 14.692 C 41.164 14.642 41.136 14.575 41.136 14.504 L 41.136 4.204 C 41.136 4.058 41.254 3.938 41.401 3.938 L 43.493 3.938 C 43.639 3.938 43.758 4.056 43.758 4.204 Z M 56.049 8.369 L 56.049 14.504 C 56.049 14.65 55.931 14.77 55.784 14.77 L 53.692 14.77 C 53.545 14.769 53.427 14.651 53.427 14.504 L 53.427 9.271 C 53.427 6.831 52.792 6.154 51.419 6.154 C 49.903 6.154 48.51 7.856 48.51 10.358 L 48.51 14.503 C 48.51 14.649 48.392 14.768 48.245 14.768 L 46.153 14.768 C 46.083 14.768 46.015 14.74 45.965 14.691 C 45.916 14.641 45.888 14.573 45.888 14.503 L 45.888 4.204 C 45.888 4.058 46.006 3.938 46.153 3.938 L 48.245 3.938 C 48.391 3.938 48.51 4.056 48.51 4.204 L 48.51 4.615 C 48.51 5.272 48.387 5.662 48.182 6.092 C 48.1 6.277 47.977 6.564 48.244 6.625 C 48.407 6.667 48.468 6.544 48.552 6.379 C 49.043 5.292 50.273 3.773 52.156 3.773 C 54.492 3.773 56.049 5.291 56.049 8.368 Z" fill="rgb(3, 49, 70)" height="18.87386814834329px" id="hdMUWt2wu" transform="translate(30.951 5.499)" width="56.04893416975801px"/><path d="M 12.859 25.72 C 19.961 25.72 25.719 19.962 25.719 12.86 C 25.719 5.758 19.961 0 12.859 0 C 5.757 0 0 5.758 0 12.86 C 0 19.962 5.757 25.72 12.859 25.72 Z" fill="rgb(255, 255, 255)" height="25.72px" id="kcc49Xo0_" width="25.718653513121154px"/><path d="M 11.599 0 C 16.884 0 21.363 3.504 22.85 8.312 C 23.002 8.802 22.468 9.222 22.026 8.961 C 21.87 8.869 21.717 8.772 21.566 8.671 C 20.628 8.046 19.897 7.207 19.044 6.483 C 18.305 5.857 17.439 5.303 16.437 5.322 C 15.438 5.34 14.632 5.925 13.78 6.369 C 13.44 6.547 13.033 6.743 12.639 6.644 C 12.11 6.509 11.765 5.922 11.437 5.525 C 10.792 4.746 10.014 3.948 9.008 3.673 C 6.764 3.062 5.465 5.3 4.291 6.771 C 3.285 8.03 2.157 9.186 0.924 10.223 C 0.524 10.561 -0.084 10.209 0.01 9.693 C 1.001 4.19 5.818 0 11.599 0 Z" fill="rgb(255, 202, 101)" height="10.356223446260525px" id="btb_0y93y" transform="translate(1.242 1.064)" width="22.876849859753918px"/><path d="M 20.285 6.872 C 19.53 6.466 18.739 6.094 17.904 5.892 C 16.819 5.63 15.729 5.768 14.63 5.698 C 13.513 5.626 12.457 5.206 11.362 5.001 C 10.373 4.813 9.358 4.82 8.372 5.019 C 6.308 5.432 4.472 6.584 2.722 7.701 C 2.052 8.129 1.367 8.565 0.66 8.958 C 0.41 9.095 0.099 8.943 0.059 8.661 C 0.038 8.51 0.02 8.36 0.004 8.209 C -0.022 7.949 0.092 7.694 0.304 7.54 C 1.74 6.503 3.072 5.326 4.263 4.014 C 4.994 3.209 5.63 2.339 6.297 1.482 C 6.875 0.738 7.676 -0.193 8.731 0.035 C 10.669 0.452 11.098 3.423 13.351 3.058 C 14.278 2.908 14.995 2.26 15.843 1.912 C 16.847 1.499 17.704 2.015 18.455 2.675 C 19.329 3.444 20.109 4.282 21.084 4.933 C 21.7 5.344 22.359 5.687 23.044 5.966 C 23.304 6.071 23.477 6.322 23.489 6.601 C 23.495 6.738 23.499 6.878 23.499 7.017 C 23.499 7.333 23.484 7.644 23.46 7.955 C 23.436 8.233 23.143 8.409 22.89 8.292 C 21.995 7.881 21.145 7.332 20.289 6.874 L 20.285 6.872 Z" fill="rgb(240, 164, 77)" height="9.009087917338391px" id="cNOEiMeo_" transform="translate(1.153 5.854)" width="23.498601734255573px"/><path d="M 22.526 4.083 C 22.473 4.277 22.415 4.469 22.352 4.659 C 22.249 4.967 21.887 5.101 21.606 4.94 C 20.286 4.179 19.051 3.26 17.624 2.691 C 16.605 2.284 15.55 2.26 14.537 2.687 C 13.568 3.098 12.731 3.834 11.69 4.07 C 10.521 4.335 9.298 4.052 8.12 4.318 C 7.02 4.566 6.07 5.206 5.053 5.659 C 3.836 6.202 2.545 6.49 1.23 6.649 C 1.02 6.675 0.816 6.569 0.717 6.382 C 0.448 5.863 0.217 5.324 0.028 4.771 C -0.054 4.529 0.051 4.262 0.277 4.142 C 2.507 2.948 4.556 1.278 6.964 0.447 C 7.944 0.108 8.972 -0.077 10.01 0.031 C 11.117 0.147 12.166 0.574 13.264 0.75 C 14.405 0.933 15.568 0.73 16.704 0.924 C 17.567 1.073 18.369 1.442 19.135 1.853 C 20.163 2.405 21.163 3.03 22.229 3.47 C 22.47 3.57 22.598 3.834 22.528 4.085 L 22.526 4.083 Z" fill="rgb(223, 111, 56)" height="6.653270512585414px" id="oIruLoKEM" transform="translate(1.685 11.884)" width="22.54698506065467px"/><path d="M 18.718 4.427 C 18.431 4.813 17.958 5.011 17.48 4.97 C 16.02 4.846 14.56 4.737 13.096 4.692 C 9.161 4.571 5.244 4.956 1.326 5.279 C 0.853 5.317 0.395 5.114 0.098 4.741 C 0.091 4.734 0.086 4.725 0.078 4.717 C -0.094 4.501 0.034 4.178 0.305 4.134 C 0.928 4.031 1.544 3.897 2.15 3.718 C 3.264 3.387 4.259 2.852 5.299 2.349 C 5.812 2.101 6.351 1.894 6.919 1.824 C 7.571 1.745 8.232 1.802 8.886 1.784 C 10.033 1.749 10.982 1.395 11.962 0.824 C 12.961 0.245 13.858 -0.239 15.036 0.127 C 16.128 0.467 17.099 1.208 18.063 1.804 C 18.509 2.081 18.964 2.349 19.427 2.597 C 19.607 2.692 19.68 2.914 19.581 3.092 C 19.323 3.557 19.034 4.004 18.715 4.429 Z" fill="rgb(167, 45, 65)" height="5.283298214825159px" id="KcoDiNvEf" transform="translate(3.547 15.521)" width="19.62551373085903px"/><path d="M 0.175 1.23 C -0.14 1.013 -0.004 0.518 0.377 0.485 C 0.939 0.437 1.502 0.391 2.066 0.345 C 4.57 0.144 7.082 -0.022 9.597 0.002 C 10.964 0.015 12.328 0.092 13.691 0.197 C 14.065 0.226 14.21 0.703 13.911 0.929 C 11.94 2.416 9.491 3.301 6.836 3.301 C 4.367 3.301 2.073 2.536 0.177 1.23 Z" fill="rgb(18, 106, 141)" height="3.3006829613952573px" id="qiN7UdRQp" transform="translate(6.031 21.374)" width="14.071434461775233px"/></g></svg>)
Automating social media strategy, creation, and posting is a surefire way to get more time back in your time while also creating a solid community of adventure-lovers around your company.

Automating social media strategy, creation, and posting is a surefire way to get more time back in your time while also creating a solid community of adventure-lovers around your company. Tour operators are already pressed for time and finding time for social media usually ends up last on the list—even though it’s a great way to get more bookings.
We’ll cover apps to automate strategizing your social media. And yes, you need to come up with a plan for it. We’ll quickly cover SMART goals, Google Analytics, and Google Alerts.
Next, we’re going to go over what apps you can use to automate social media creation, like Canva, Unsplash, and user-generated content.
Finally, we’ll touch on apps that’ll help you automate scheduling and posting your social media content. Let’s dive in!

Apps To Automate Social Media Strategy
You can’t just start posting to social media willy-nilly. Well, you can, but it’ll feel really random and you won’t gain much traction with hopeful followers. It helps to come up with a plan. But when you don’t have a ton of time and didn’t major in marketing, what’s the next best option?
Using programs to help you create a strategy instead. We’re going to cover three different apps that’ll help you plan and create SMART goals, define your target audience, and see what your competition is doing.
Use Asana to plan and create SMART goals
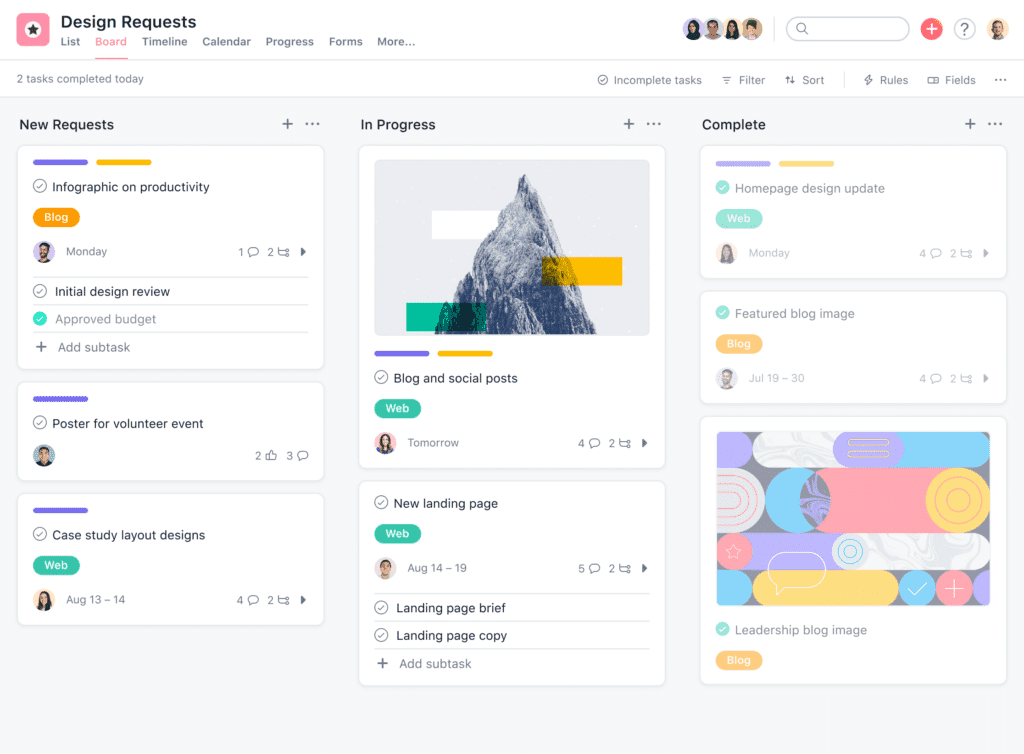
Asana is a project management app that can help you plan and create SMART goals for your social media strategy. In case you haven’t heard the term before, SMART goals are Specific, Measurable, Achievable, Relevant, and Timely goals. It’s a framework to keep you focused and help you accomplish your goals. Here's how to use Asana for this purpose:
1. Setting Up Your Asana Workspace
Start by creating a dedicated workspace within Asana for your social media planning and goal-setting activities. You can organize this workspace with specific projects for each social media platform or campaign (i.e. A workspace for Facebook separate from Instagram).
Within each project, create tasks or sections for different aspects of your social media goals. For example, you can have sections for content creation, scheduling, analytics, and engagement. You can also create tasks for social media like 5 pictures on Unsplash or create a catchy hashtag to tell followers to use so you can find user-generated content faster.
2. Defining SMART Goals
After you’ve created your workspace, define specific goals for your social media strategy. For example, "Increase Instagram followers by 20% in the next three months."
You want to make your goals measurable so you can track their progress. Having the goal "Increase Instagram followers by 20% in the next three months” means in three months you’ll be able to see if you’ve increased your followers by 20% or not.
When creating a SMART goal, make sure it’s achievable and relevant to your overall tour business objectives. Ask yourself, "Can I realistically achieve this goal with my current resources?" and "Does this goal fall in line with our overall marketing strategy?" If you realize you’re spending too much time increasing your followers and aren’t seeing more tour bookings, this may no longer be a relevant goal for you.
Last, set a timeframe for your goals. Specify when you want to achieve them. Our example says "Increase Instagram followers by 20% in the next three months." Within three months, you should see whether you increased your followers.
3. Planning and Execution
After you’ve created your SMART goal, break it down into smaller tasks. So, if your goal is to increase your Instagram followers by 20%, you can create tasks like "research relevant hashtags," "plan and create engaging posts to post 3 times per week," and "run follower acquisition campaigns."
If you’re a one-person team, then it’s on you to accomplish these tasks. But if you have staff, assign them responsibilities and set due dates to keep them accountable and to get things done.
The great thing about Asana is you can give yourself due dates, which Asana can email or notify you through the app of the impending deadline. You can also use Asana's calendar view to plan posts according to your goal timeline. This feature helps you visualize your posting schedule and ensures that you're staying on track.
Use Google Analytics to define your target audience
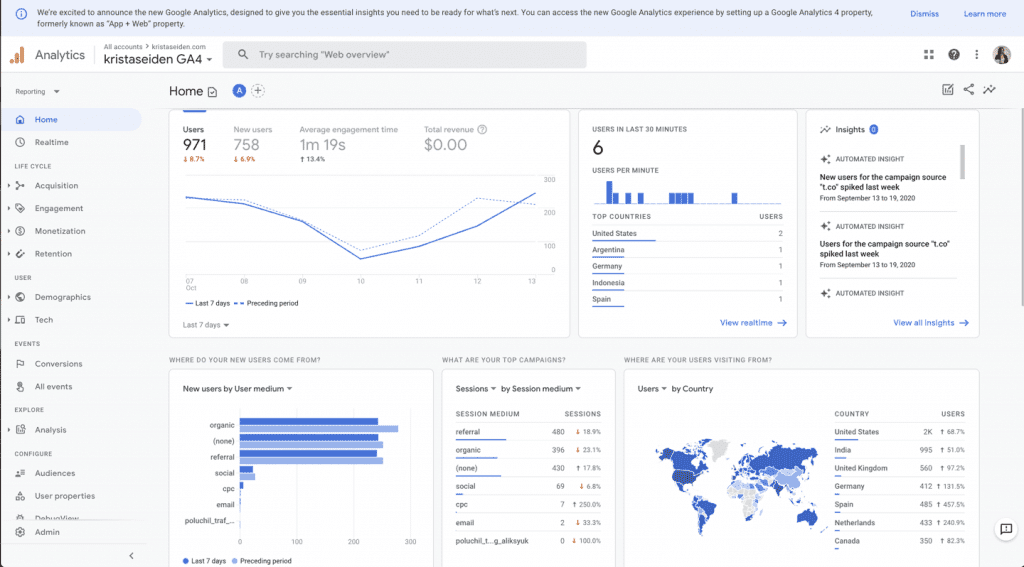
Google Analytics is a free yet powerful tool that can provide valuable insights to help you define and understand your target audience more easily. It’s a fair bit of learning to get Google Analytics to work for you automatically, but once you have it set up and you understand how it works, it’s invaluable.
1. Accessing Demographic and Interest Data
Start by setting up Google Analytics on your website if you haven't already. Once it's set up and tracking data, go to Reports > User Attributes > Demographic Details.
If there isn’t anything here you probably haven’t enabled Google Signals on your GA4 account (this allows Google to collect the information and build up audiences). To allow for Google Signals to collect information, click on the settings cog in the bottom left-hand corner and navigate to Data Settings > Data Collection. Then enable it.
If there are charts and graphs, then you’re collecting information from your site. Use this data to gain insights into the demographics and interests of your current audience. For instance, you might learn that the majority of your visitors are between 25 and 34 and are Movie Lovers.
2. Examining Location Data
In Google Analytics, under Demographic Details, you’ll also find Country, Region, and City data, which shows you the general location of your website visitors.
By analyzing location data, you can identify regions or countries where your website has a significant audience. This can be valuable for tailoring your content or marketing efforts to specific geographic areas.
Also, knowing where your audience is located can help you refine your target audience if you realize your content or tours resonate particularly well in certain regions (i.e. more locals come to your website than international travelers).
3. Behavior and Conversion Analysis
If you have “Examine user behavior” enabled in your Reports, you can see what pages and screens they viewed, and what they did when they got there (Did they sign up for your newsletter? Did they leave your site?).
These reports also show what tours are doing the best and what ones aren’t. If you have a lot of bounces on a certain tour landing page, this could be a sign that there’s something wrong on that particular page.
By identifying the pages that lead to conversions and understanding the paths customers take to reach them, you can refine your content and messaging to better resonate with your target customer’s needs and interests.
Use Google Alerts To See What Your Competition Is Doing
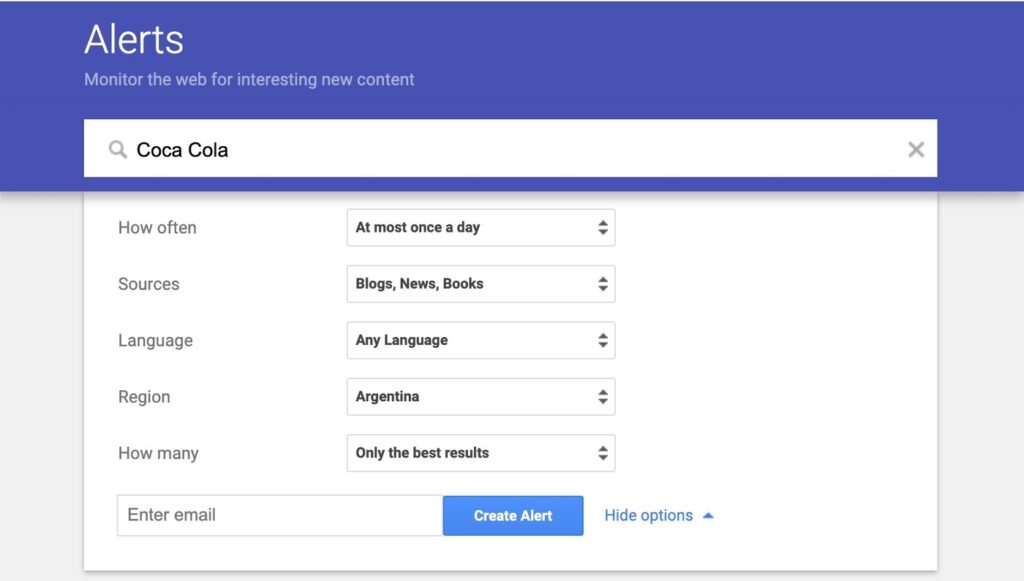
Google Alerts is a free tool you can use to monitor your competition's online activities like offering new tours or specials (and staying on top of relevant news and mentions for your company). Here's how to use Google Alerts effectively for competitive analysis:
1. Set Up Alerts
Go to the Google Alerts website: https://www.google.com/alerts and sign in.
In the search bar, enter the names of your competitors or specific keywords related to their businesses, tours, or industry (use quotation marks for exact phrase matching).
You can customize the settings, like frequency of email notifications, sources (news, blogs, web, etc.), language, region, and the number of results you want to receive, for your alerts.
Click "Create Alert" to set up the alert, and Google will begin monitoring the web for new content related to your specified keywords.
2. Analyze Results
As Google Alerts discovers new content related to your competitors or keywords, it’ll send emails with links to articles, blog posts, news stories, and mentions.
Regularly review these alerts to stay up-to-date on what your competitors are doing, such as product launches, marketing campaigns, industry trends, or news articles that feature them. Also, this information can not only help you see what your competitors are doing, it’ll help you identify opportunities and threats in the tour industry.
3. Take Action
Use the insights gathered from Google Alerts for your own strategies. For example, if you see a competitor receiving positive media coverage for a particular tour, consider how you can offer something better.
Track the frequency and volume of your mentions compared to your competitors. Are they getting more attention in the media or online conversations? This may show you areas where you need to step up your efforts.
Finally, be proactive in responding to any negative mentions or criticisms about your competition. Use this as an opportunity to address these issues professionally to show your tour company’s commitment to customer satisfaction and ethics.
Using Asana to plan your social media strategy, Google Analytics to inform you of your current audience, and Google Alerts to see what your competition is doing is the first step to automating your social media as a tour operator.

Apps To Automate Social Media Creation
So, you’ve got your social media strategy automated. You’ve created your plan in Asana. You reviewed the data in Google Analytics and know who’s coming to your site. You’ve set up Google Alerts to keep tabs on mentions of your company and your competitors. Now you have to actually create your social media posts.
This doesn’t have to be as intimidating and time-intensive as you might think. There are ways to automate social media creation so you’re not spending all of your time creating posts for your followers. You can do three things: Use Canva templates to create social media posts, use Unsplash to find jaw-dropping pictures, and ask your customers to tag you on social media so you can repost their pictures and videos.
Let’s go over how to do this:
Use Canva To Create Social Media Posts
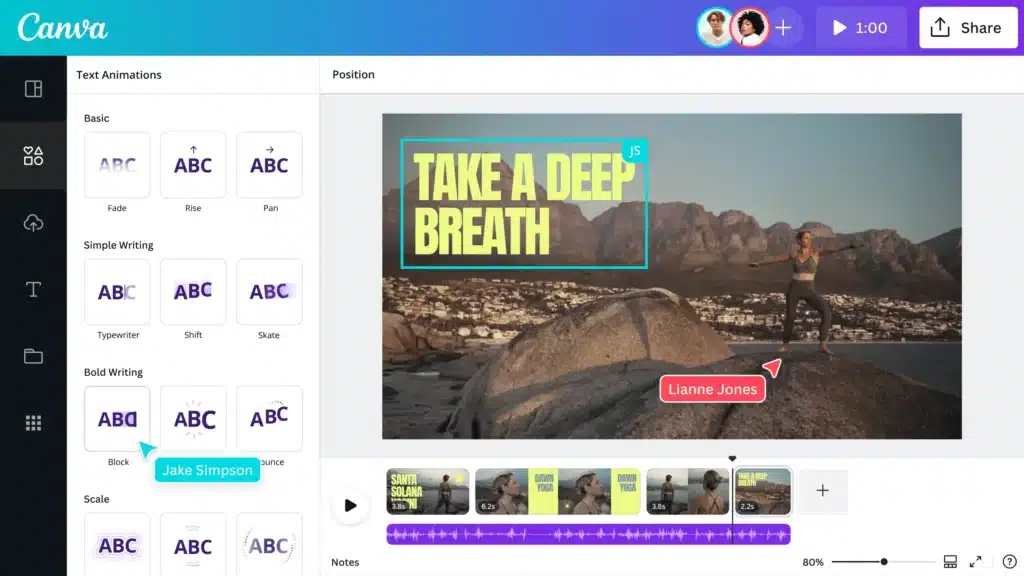
Canva is a super user-friendly design tool that can greatly simplify the process of creating engaging and visually appealing social media posts. Here’s how to start using it:
1. Choose Your Social Media Post Type
Select the type of social media post you want to create. Canva offers a giant range of templates designed specifically for various platforms, including Facebook, Instagram, Twitter, and more.
Browse through Canva's extensive template library, which includes options for quotes, promotions, announcements, and more. Choose a template that aligns with your content and branding goals. You can also start with a blank canvas if you’re confident in your graphic design skills.
2. Customize Your Design
Once you've chosen a template, you can customize it to match your company’s colors and vibe. Canva's drag-and-drop interface makes it easy to add or edit text, images, and elements.
Upload your own images or choose from Canva's vast collection of stock photos, illustrations, icons, and graphics. You can also adjust the color scheme, fonts, and background to match your company’s identity.
3. Export and Share
Once your social media post is ready, click on the "Download" button to save your design in the desired format (e.g., JPEG, PNG) and quality. Canva also offers an option to directly share your post on social media platforms, which can help automate your social media posting further.
When you’re a tour operator with limited time, using Canva's intuitive interface makes it easier for you to produce high-quality social media content.
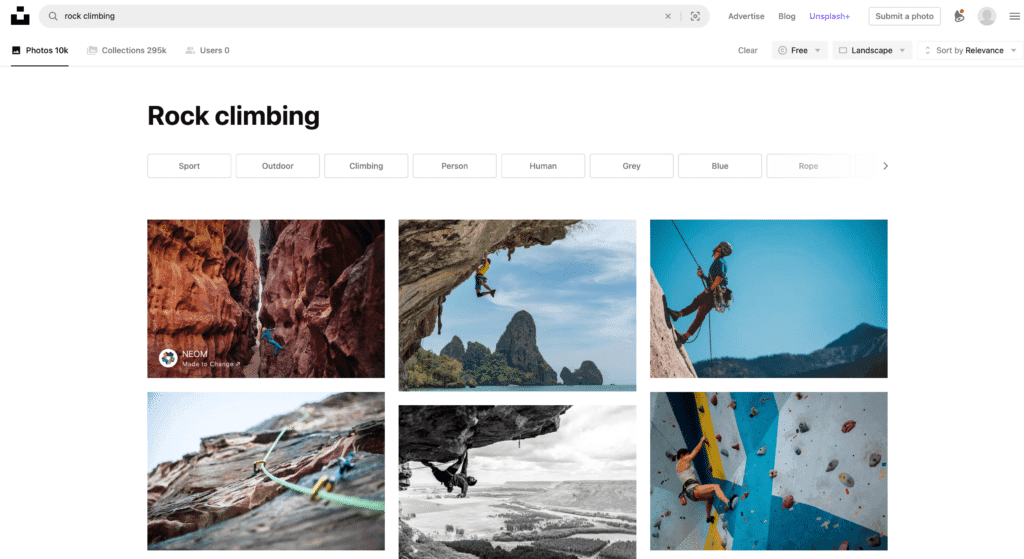
Use Unsplash To Find Pictures When You Don’t Have Your Own
Unsplash is another fantastic resource for finding high-quality, royalty-free images when you don't have your own photos to use. Here's how to effectively use Unsplash when you don’t have your own photos or photos from your guests:
1. Search and Discover Images
Enter keywords related to the image you're looking for in the search bar. Be specific to get the most relevant results (i.e. women rock climbing).
Unsplash has a giant library of photos with a wide range of subjects and styles, so you're likely to find something that fits your company’s vibe.
2. Preview and Download
Click the "Download" button to download the picture (it comes in three sizes too if you want something bigger or smaller).
3. Credit and Appreciate Photographers
While not required, it's best practice to give credit to the photographers whose work you use. You can include a photo credit in your social media post, mentioning the photographer's name and linking back to their Unsplash profile.

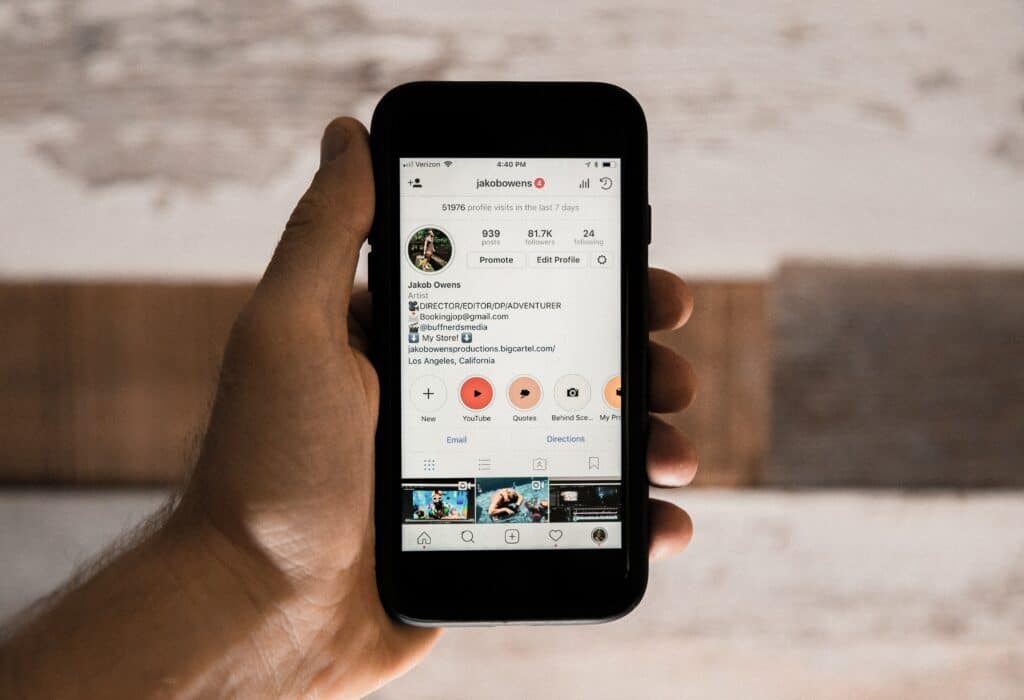
Enlist User-Generated Content To Make Posting New Content Easier
Enlisting user-generated content (UGC) is a smart strategy to make posting new content easier while also increasing engagement and building trust with your audience. Here's how to effectively harness UGC to automate social media content creation:
1. Encourage Your Clients to Participate
Start by actively encouraging your clients (and followers) to create and share content related to your company and the tours you provide. Ask on your social media posts or run contests. Tell your clients about it in your newsletters and ask them to tag you at the end of tours.
It’s a good idea to create a branded hashtag specific to your company too. This way, it makes it easier for you to find posts by your followers and clients on Instagram and Twitter.
2. Curate and Share UGC
When you find photos or videos you can use, ask permission from the content creators to share their posts on your own social media channels, website, or marketing materials. You’ll avoid any disputes this way. A real quick note will suffice: “Hi! We love this shot! Would you mind if we shared and featured you on our page? Full photo credit of course. 😊”
When sharing UGC, give the creator credit by tagging them or including their username (i.e. “Photo by [Creator’s Name or Handle]”.
3. Repurpose and Create Engaging Content
You can repurpose UGC into different formats, like image carousels, video compilations, or customer testimonial posts. Share these across your social media channels to show your clients’ authentic experiences and interactions with your tour guiding company.
You can also use your guests’ photos and videos as inspiration for your own content ideas. See what resonates the most with your audience and create similar content yourself to complement the user-generated material.
By consistently incorporating UGC into your social media content strategy, you’ll not only save time and effort on content creation but also build a sense of community around your company because you’re sharing your guests’ posts. It’s a win-win.
Apps To Automate Social Media Posting
You’ve made your automated social media plans using Asana, Google Analytics, and Google Alerts. You’ve gathered content from Unsplash and from past guests and made a post using Canva. Next and finally, is posting to social media channels.
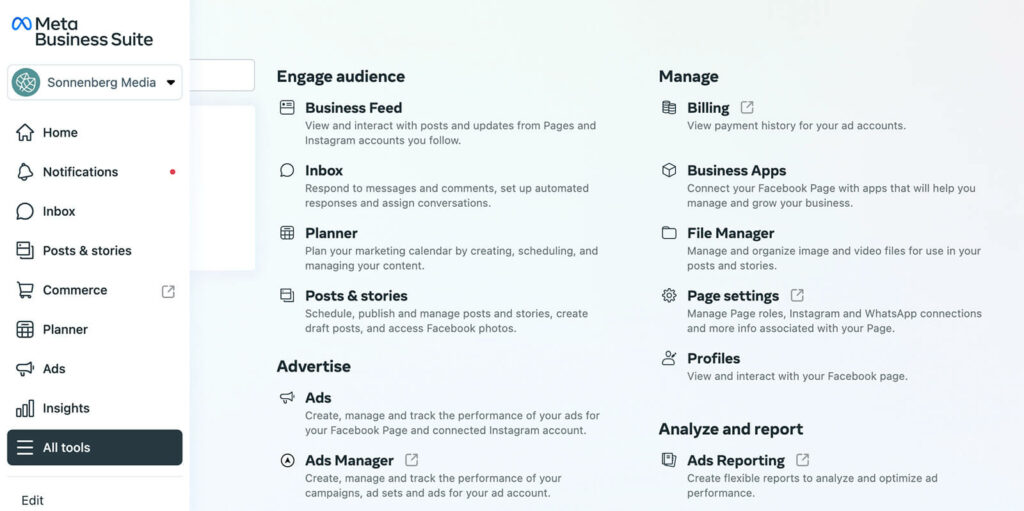
Use Meta Business Suite To Schedule Instagram And Facebook
Meta Business Suite, previously known as Facebook Business Suite, helps you manage and schedule content on Instagram and Facebook for free. So, if those are the only two platforms you use, take advantage of this free tool instead of paying for social media scheduling. Here's a guide on how to use it:
1. Log in to Meta Business Suite
You can log in using your Facebook business account at business.facebook.com. If you haven't already, link your Instagram account to your Facebook business page.
Once you’re logged in, you'll see the Business Suite dashboard, which gives you access to tools like content scheduling for Facebook and Instagram.
2. Scheduling Content
To schedule a post, click on "Create Post" or "Create Story" from the dashboard. You can choose to create content for Facebook, Instagram, or both.
Make your post by adding text, images, videos, etc. You can also customize the post's format, such as a regular feed post, story, reel, or carousel (note: Instagram requires certain sizes to post)
After creating your post, click on the drop-down arrow next to the "Publish" button. Here, you'll find the "Schedule" option. Select this to choose the date and time when you want your post to go live. You can schedule a month out right now.
3. Managing Scheduled Content
You’ll be able to see and manage all your scheduled content in the "Scheduled Posts" tab within Meta Business Suite.
Additionally, Meta Business Suite offers features for analyzing post performance, responding to messages and comments, and tracking insights across Facebook and Instagram. You can use these tools to monitor your social media efforts and change up your strategy over time.
Meta Business Suite will help you automate social media scheduling and managing content on Instagram and Facebook. This will save you time and help you plan your content strategy more efficiently. You’ll also be able to engage with your audience easier on these social media platforms.
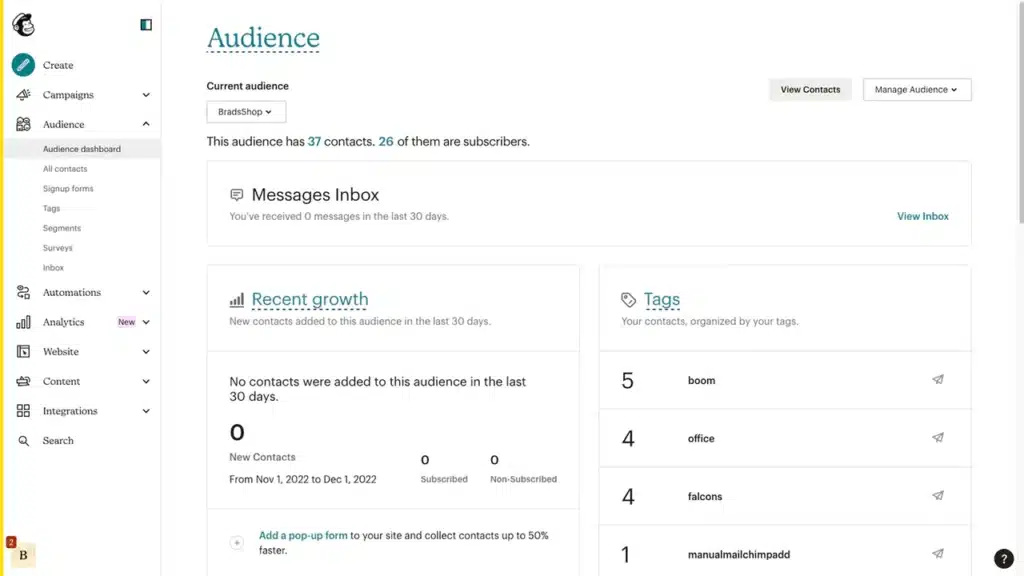
Use Mailchimp To Post To Facebook, Instagram, And Twitter
Mailchimp is primarily known as an email marketing platform, but it also offers social media posting capabilities so you can share your email campaign content on Facebook, Instagram, and Twitter. Here's how to use Mailchimp to post to these social media platforms:
1. Connect Your Social Media Accounts
Start by logging in to your Mailchimp account and connect your Facebook, Instagram, and Twitter accounts to your Mailchimp account. You can do this by going to the "Audience" tab, selecting "Manage Contacts," and then choosing "Settings" and "Connected Sites."
Once your social media accounts are connected, you can link your email campaign to them.
2. Share Your Email Campaign
In your email campaign editor, click on the "Social" tab. Here, you'll find options to share your email campaign on Facebook, Instagram, and Twitter.
Customize the text that will accompany your social media posts to give context and encourage engagement. You can also choose the date and time for your posts to go live. Besides posting your email newsletters, you can create social media posts like you would in Meta’s Business Suite. Here are instructions on how to do that.
3. Review and Post
After you've configured your social media sharing settings, click "Schedule" or "Send Now" to publish your email campaign and simultaneously share it on your connected social media accounts.
Mailchimp will automatically post your email campaign content on the selected social media platforms according to your specified schedule or immediately if you choose "Send Now."
Using Mailchimp to post to Facebook, Instagram, and Twitter lets you repurpose your email campaign content and reach a broader audience across multiple channels. It's an automated way to maintain consistency in your messaging and engage with your followers on social media platforms while leveraging the content you've already created for your email subscribers.
Use Zapier To Post To Several Platforms Automatically
Zapier is the new IFTTT. It’s an automation platform that can automate your social media posting process by connecting different apps and services together. Here's how to use Zapier to automatically post to several social media platforms:
1. Set Up a Zap
Start by creating a "Zap" in your Zapier account. A Zap is an automated workflow that connects two or more apps. To post to multiple social media platforms, you'll need to select an app as a trigger (e.g., Gmail, RSS feed) that initiates the posting process.
Choose your trigger app based on where your content originates. For example, if you want to post your blog updates, you might choose an RSS feed as your trigger.
2. Configure Actions for Social Media Posting
After setting up your trigger, choose the actions that will post your content to social media. Search for and select the social media apps you use.
Connect your social media accounts to Zapier (You'll need to grant Zapier access to your social media profiles to automate posting).
Customize the content of your social media posts within Zapier. You can use data from your trigger app to populate your posts with dynamic content, such as blog post titles, images, and links.
3. Test and Activate Your Zap
Before activating your Zap, it's crucial to test it to ensure everything works as expected. Zapier has a testing feature that lets you see how your Zap will function when triggered.
Once you're good with your Zap, activate it. Your Zap will then run automatically whenever the trigger conditions are met, posting content to your selected social media platforms without manual intervention.
By setting up Zaps, you’ll automate your social media posting across different channels, which will help you save a ton of time.
Here's more information on using Zap to publish social media content.
Conclusion
There’s a lot you can do by way of automating social media. Just like the Verizon phone commercial back in the day, there’s an app for that. Utilizing just one app for each section—Strategy, Creation, and Posting—will save you tons of time and make posting on social media easier and less intimidating.
The customer experience starts well before they meet their guide, step on the boat, get on a bike, or put on a harness.
Save Time
Grow Your Business
Share


